


Cultivating mushrooms may seem mysterious, but it’s actually fairly simple. There are many methods used by cultivators, but whether you are a small-scale hobbyist at home or mushroom farming in a large-scale commercial operation, it’s the same basic process. Let's dive in.

How are Mushrooms Grown?
Certain kinds of fungi produce fruiting bodies in their reproductive stage which are called mushrooms. These can take a wide variety of shapes and sizes; many of them are some variation on the familiar cap-and-stalk mushrooms you would recognize from the supermarket produce aisle. But amidst the many thousands of mushroom-producing fungus species you will find a wide variety of shapes and sizes. Depending on the species, they can require different environmental conditions and nutrients to thrive. But the process of growing mushrooms is much the same for all of them, and can be broken down into a few simple steps. With a little preparation, you can cultivate many of your favorite types of mushroom at home.
Mushroom Cultivation Step-By-Step
We’ll take you through the steps in greater detail below, but the basic steps are largely similar, whether you are running a small scale grow room or a mushroom farm. Start with spores that have been prepared under laboratory conditions, and cultivate those in a sterile growing medium to propagate mushroom spawn, also called mycelium. These fibrous tendrils of mycelium, known as hyphae, reach out to absorb nutrients, and when you introduce them into grain, will quickly colonize everything within reach. Once the grain is fully colonized with mycelium, you’ll evenly mix it into a larger quantity of substrate, which will give the mycelium the nutrition it needs to grow and produce healthy mushrooms.

Step 1 - Culturing Mushroom Mycelium
Culturing is the process of isolating and growing spores or mushroom tissue cultures in a controlled environment.
Choosing A Culture Medium
Everything starts with the mushroom spores. Culturing is the process of using a growth medium to nurture microscopic spores into mycelial spawn.
To ensure quality and prevent contamination, most mushroom cultivators start with spores which have been prepared under laboratory conditions. This can take a variety of forms, from spores in a sterile agar plate to liquid culture or a spore syringe. Take some time to research the kind of mushroom you want to grow, what it needs to thrive, and assess your growing space. Many factors may influence which method you use for culturing.
Agar Plate, Spore Syringe and Liquid Culture

Agar Plates
An agar plate (also sometimes referred to as “plate culture” or just “agar”) is a petri dish containing sterilized nutrients for culturing spores. Transferring from agar plates takes some meticulous attention to sterility, but can allow for rapid multiplication and is essential for lab work, as well as for ensuring genetic purity and health of mushroom cultures. Agar plates are typically used for strain isolation, maintenance, and master cultures.

Liquid Culture and Spores
A spore syringe is drawn from the many spores of a single mushroom, whereas liquid culture contains cloned copies of the same single spore, often derived from a small sample of an agar plate culture. Liquid culture is a better approach for consistent results and rapid colonization, compared to starting with spores or small pieces of agar. This makes liquid culture ideal for actually growing mushrooms. But if you want to, for example, select for particular qualities, a spore syringe offers more genetic diversity to work with. Depending on your needs, any of these approaches may be useful.

Step 2 - Grain Preparation & Sterilization

For the next step you will want to select sterilized grain (often wheat bran, rye or something similar) for inoculation, or you can sterilize grain yourself with the help of a pressure cooker and a stove. Grain makes an excellent medium for inoculation because they are small, nutrient-rich packets that give mushroom spores the energy they need to grow and develop mycelium. Once inoculated, these grains can then be evenly distributed throughout your substrate for rapid colonization.
Grain spawn
When it comes to grains, mushroom mycelia are usually not that picky. Many grains, like wheat, barley and sorghum, are densely packed with the starches, proteins and nutrients mycelia need to rapidly grow. Some cultivators even use corn due to its low cost. Whichever grain you use, make sure that you prepare them properly to set yourself and your mushrooms up for success. Sterilize your grains carefully - long enough to kill potential contaminants but not so much as to overcook or alter the hydration levels of the grain.
Step 3 - Grain Inoculation
Inoculation: The act of introducing a mushroom culture into a growth medium - in this case, sterilized grain.

Under sterile conditions, use your liquid culture or colonized agar to inoculate sterilized grains with mushroom mycelium. Make sure to wear gloves and sterilize any instruments between use.
This process can be done by adding an agar wedge to sterilized grain, or by injecting liquid culture into sterilized grain.
Note: It is critical that you do this step in a still air box or flow hood to give yourself the best chance for success; exposing your sterilized grain to the outside world without the correct preparations or equipment can result in contamination.
Step 4 - Grain Colonization
Once inoculated, the mycelium will eagerly grow and expand to colonize each individual grain, making it easy to evenly distribute throughout the substrate later. This colonized grain is sometimes referred to as mycelial spawn or grain spawn.
Procedure: Place inoculated grain in a dark place, ideally at a temperature between 70-78* F, and monitor for signs of growth or contamination for about 10-14 days until fully colonized.
Step 5 - Choosing the Bulk Mushroom Substrate
Bulk Substrate: The final sterilized substrate, typically wood-based or enriched with manure, that is to be inoculated with the mycelial spawn.
Picking a Substrate
Be sure to use the correct food source for your mushroom - Some species prefer wood-based substrates (including gourmet mushrooms like shiitake mushrooms and medicinal species like oyster mushrooms), while others thrive on manure-based substrates or even coffee grounds. Most common substrates are usually formulated with either wood-loving or dung-loving mushroom species in mind, since many of the varieties people want to grow fall into one of those two categories.
Mushroom Substrate Types and Nutrition Requirements
Different types of mushrooms require different nutrients to thrive, so do your research to select the right substrate in which to grow them. Many of the most popular mushrooms can be classified as either wood-loving or dung-loving types, and most commercially available substrates fall into these categories. Pre-mixed substrates will usually have a base of either manure or hardwood, with materials like gypsum often added to aid water retention and other minerals to provide trace nutrients.
But for optimal growth you will find that some mushroom species are very finicky, and thrive when you fine-tune the levels of this or that nutrient. If you are a particular kind of mushroom nerd it can be fun to get very granular about your mix of nutrients. There is no bottom to this rabbit hole of discovery, and it can be very rewarding to do this kind of science at home.
Wood-based Substrates
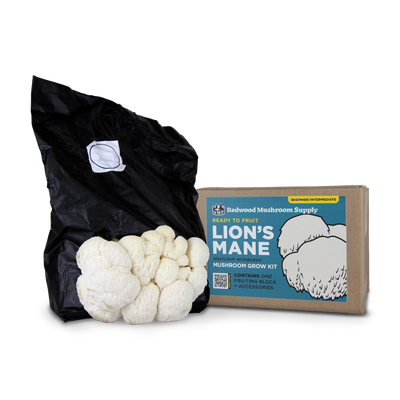
Wood-based substrates often consist of wood chips from hardwood trees, sawdust and added nutrients. In some cases, wood-loving mushrooms can even be grown by drilling holes in prepared logs and inoculating them with your choice of mycelium. Many prized species of edible mushrooms, from morel & shiitake to lion’s mane, thrive on hardwood.
Dung-loving Substrates
Manure-based substrates are usually made using horse manure or chicken manure, along with straw and a mixture of other nutritional ingredients like nitrogen supplements and gypsum to aid healthy and rapid growth. Some edible mushrooms like portobello and crimini mushrooms, as well as several varieties of active fungus, fall into the dung-loving category.
CVG (Coco Coir, Vermiculite, Gypsum) Substrates
CVG substrates are also effective mediums for cultivating dung-loving mushrooms. These substrates utilize simple inputs available from most garden centers to create the ideal environment for dung-loving mushrooms without the need for manure or compost, but can be enriched with smaller amounts to improve overall nutrient balance. Pasteurization of CVG substrates is easy to do at home and requires no special equipment, making it a common go-to for home growers.
Sterilization vs Pasteurization - Is there a difference?
For the purposes of mushroom cultivation, sterilization is usually preferable to pasteurization. Pasteurization is a process in which the material in question is treated with a brief burst of heat that kills most microbes. This is a common process in the food industry, and extends the shelf life of consumables like milk without actually cooking it. Sterilization takes the process further, exposing the material to enough heat to reliably kill all microbial activity. Mushrooms can be very sensitive to outside contamination, so in most cases you will want to work with sterilized grain and substrate.
Step 5 - Spawn-to-Bulk
Spawn is the fully colonized grain that will be used to inoculate bulk substrate.
Spawn-to-Bulk is the process of mixing the colonized spawn with a bulk substrate.
Procedure:
1: Break apart the colonized grain spawn and mix it evenly throughout your bulk substrate in a mushroom grow bag or monotub.
2: Reseal your grow bag or place the lid on your monotub to begin colonization of the substrate.
Step 6 - Mushroom Substrate Colonization
Substrate Colonization: The phase in which the fungal mycelium expands from the grain spawn to grow throughout the substrate.
Procedure: Place the inoculated bulk substrate container or plastic bag in a controlled environment - ideally a dark, clean place with low airflow, and a temperature range of 70-78 Farenheit. Regularly check for signs of mycelial growth and potential contamination (like green mold or bacteria).
Step 7 - Fruiting Your Mushrooms
Fruiting: The stage in which the mycelium produces fruiting bodies, commonly known as mushrooms 🍄
Fruiting Conditions: Environmental conditions like temperature, relative humidity levels, carbon dioxide, and fresh air exchange are crucial for the development of primordia, also known as pins, which will mature into the fruiting stage. When you see pins develop on your substrate, the fruiting stage is imminent. High humidity, cooler temperatures, and proper air flow help drive mushroom development.
Different Mushroom Cultivation Methods
Depending on your resources, local conditions, and the needs of the mushroom you are trying to grow, there are many approaches to fruiting. Here are a few common methods for fruiting mushrooms.
Bins or “Monotubs”
Plastic bins or tubs are a very common method for growing mushrooms indoors, and there are several varieties of purpose-built mushroom bins on the market. They have a few advantages over some other methods; bins are watertight and can usually be cleaned and reused many times, and are easy to move around. Plastic liners are also available to make cleanup even easier.
When growing in Bins, species that prefer top-fruting are recommended. Bins tend to utilize filters to promote air exchange and keep humidity in the high 90's without any need for additional equipment, making them an excellent no-fuss cultivation method. The hardest part is waiting, really!
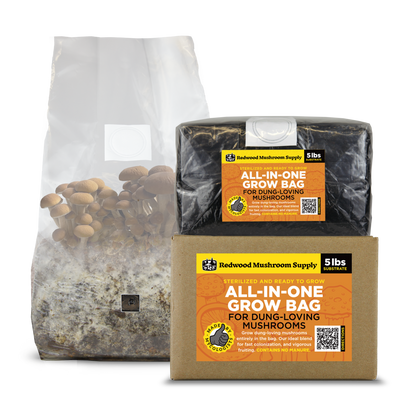
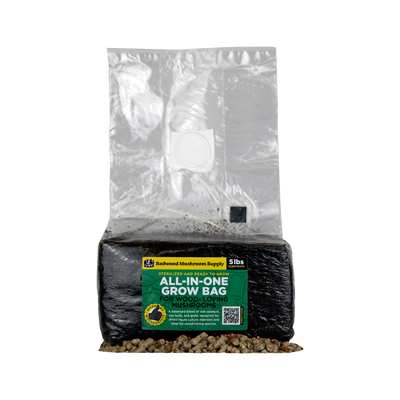
Mushroom Grow Bags
Many new growers and those without special sterilization equipment prefer growing mushrooms in sealed plastic bags pre-filled with a batch of sterile substrate, which reduces the number of steps and the risk of contamination, while also maintaining high CO2 levels many mushrooms need for growth. Such bags may also include grain premixed into the substrate to reduce the need for grain transfers, also known as "all-in-one" grow bags. This method is probably the least fuss, and a convenient way to explore mushroom cultivation without a big commitment of time or equipment, and most mushrooms compatible with all-in-one grow bags can fruit directly in the bag for their entire lifespan!
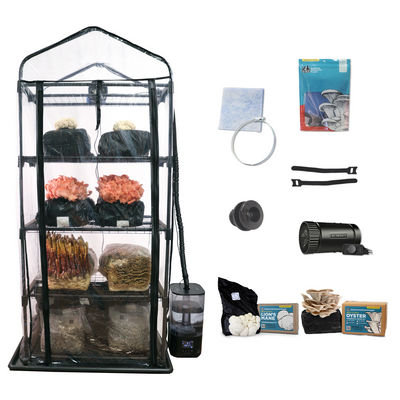
Fruiting Chambers & Mushroom Grow Tents
Fruiting chambers are enclosed structures which allow you to control the CO2, temperature, light and humidity during different phases of growth. If you picture how mushrooms in nature emerge from under the ground, you can understand how during fruiting, many mushrooms prefer lower CO2, more fresh air and slightly more light than during earlier growth phases. Depending on your local environment and the type of mushroom you are growing, a fruiting chamber might be necessary to create optimal conditions for a good harvest.
Fruiting chambers can be quite small and portable, such as plastic bins and so-called ‘Martha’-style tents, which are narrow shelving units enclosed by plastic sheeting. However, in commercial mushroom operations and large mycology labs, fruiting chambers can take up entire rooms. It really depends on the scale of your setup and your available resources.
Buckets
Growing mushrooms in buckets is a relatively easy way to get started, and makes harvesting a snap. By drilling a few strategically placed holes in a 5 gallon bucket or other food-grade plastic container, some types of mushrooms will seek the holes for their fruiting phase. You then simply break the mushrooms off where they emerge from the holes.
It has some advantages; the buckets are reusable as long as you don’t mind the work of cleaning them, and with stackable buckets your operation is easily scalable for almost any grow size.
Step 8 - Harvesting Mushrooms
The best part about mushroom cultivation? Harvesting the fruits of your labor (or fungus)!
Be sure to research ideal harvesting times for each species you grow in order to harvest at peak maturity. Waiting too long to harvest will cause your mushrooms to release spores.
When the mushrooms have fully matured, carefully separate from the substrate using a knife, or twist and pull at the base to remove. Enjoy your mushrooms.
Additional Flushes
Under ideal conditions, mushrooms will repeat the production of fruiting bodies again after harvesting. Each new development of mushrooms in a grow is known as a flush. Some strains of mushroom may develop two, three or even more flushes before the substrate runs out of energy.
Step 9 - Scaling & Growing Mushroom Cultivation
Reducing production costs
The single biggest way to reduce your production costs would be to sterilize your own materials. A pressure cooker is a vital tool for these purposes. Reducing contamination risk significantly reduces spoilage and wasted product, so a still air box is an important tool for keeping your work space and materials sterile. A flow hood takes maintaining a sterile work space to the next level, and if you are growing large quantities this absolutely becomes worth the investment. By the same token, consider investing in a bag sealer to protect and preserve your harvest materials. There’s a bit of a learning curve here, and some upfront costs, but as the scale of your operation grows, so does the value of investing in this specialized equipment. Meticulous hygiene and attention to detail up front will pay off quickly.
Reducing waste
There are always things you can do to fine-tune your operation, and reduce your footprint. Mushroom cultivation tends to use a lot of plastic for convenience of cleanup (like grow bags), which is not ideal. But you can start by using methods that allow reuse, like food-grade buckets. As long as you are willing to do the work of cleaning your containers, you can massively reduce the waste you are creating.
The great thing about mushrooms is that your exhausted substrate can be a great addition to compost. Instead of tossing it out and contributing to landfills, recycle your substrate for gardening purposes. Your plants will be happy, and you might even get some more mushrooms out of it!
In Conclusion
While the details of mushroom cultivation can vary widely based on the species and the methods you use, the basic process of mushroom growing is much the same. Do your research beforehand and carefully create the ideal conditions for your crop, then follow these steps to successfully grow your own mushrooms any time!


